Root


  • Home

  • About

  • Tags

  • Categories

  • Archives

异步基础

Posted on 2018-06-23 | In 异步

异步的实现原理

例如AJAX,不会立即执行,而是等待请求成功之后才能执行
传递过去不执行,等待结果后再执行的函数,称之为回调函数
实现异步的核心原理:将callback作为参数传递给异步执行函数,当有结果返回之后再触发callback
常见的异步操作:
网络请求
IO操作
定时函数:setTimeout只在指定时间后执行一次
setInterval以指定时间为周期循环执行

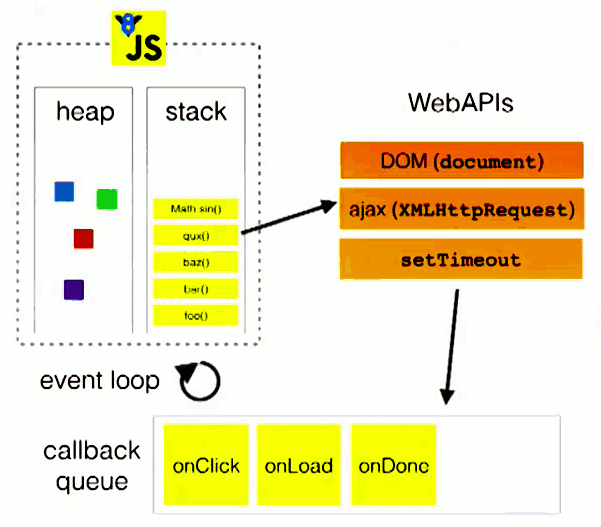
异步操作不进入主线程,而是进入“任务队列”

异步执行机制:·分为执行栈和任务队列两步
●主线程空,就会去读取“任务队列”
●异步必须指定回调函数,主线程执行异步任务,就是执行对应的回调函数

异步和event-loop(轮询机制):主线程丛“任务队列”中读取事件

avatar

Node.js的event-loop:不同于浏览器环境

process.nextTick:它指定的任务总是发生在所有异步任务之前
setImmediate:在当前“任务队列”的底部添加事件,它指定的任务总是在下一次
event loop执行(setImmediate指定的回调函数,总是排在setTimeout前面,实际上,这种情况只发生递归调用的时候)

事件绑定算不算异步?

看起来一样
同:同样使用event-loop,
异:事件绑定有明显的订阅-发布模式
异步操作完成后,系统会自动调用;事件绑定之后,需要用户手动调用

异步调用方式

  1. 回调函数callback
    fn2(fn3):fn2和fn3完全耦合在一起,保证fn3是在fn2之后执行的
  2. 事件订阅/发布(ES5)
    如何顺序执行?(保证const asyncFunArr = new AsyncFunArr(fn1, fn2, fn3)中fn函数是顺序执行的)

    1
    2
    3
    4
    5
    6
    7
    8
    9
    10
    11
    12
    13
    14
    15
    16
    17
    18
    19
    20
    21
    22
    23
    24
    25
    26
    27
    28
    29
    30
    class AsyncFunArr {
    constructor (...arr) {
    this.funcArr = [...arr]
    }
    next() {
    const fn = this.funcArr.shift()
    if (typeof fn === 'function') fn()
    }
    run () {
    this.next()
    }
    }
    const asyncFunArr = new AsyncFunArr(fn1,fn2,fn3)

    function fn1 (){
    console.log("Funtion1")
    asyncFunArr.next()
    }

    function fn2 (){
    setTimeout(() => {
    console.log('Function2')
    asyncFunArr.next()
    },500)
    }

    function fn3 () {
    console.log('Function 3')
    asyncFunArr.next()
    }
  3. Promise:函数返回Promise

    1
    2
    3
    4
    5
    6
    7
    8
    function fn2 () {
    return new Promise((resolve,reject) => {
    setTimeout(() => {
    console.log('Function 2')
    resolve()
    },500)
    })
    }
  4. generator:异步函数会通过yield执行,异步函数内通过next激活generator函数的下一步操作(维护内部yield的执行)

    1
    2
    3
    4
    5
    6
    7
    8
    9
    10
    11
    12
    13
    14
    15
    function fn2 () {
    setTimeout(() => {
    console.log('Function 2')
    af.next()
    },500)
    }

    function* asyncFunArr (...fn) {
    fn[0]()
    yield fn[1]()
    fn[2]()
    }
    const af = asyncFunArr(fn1,fn2,fn3)

    af.next()
  5. 使用async/await——————Promise-async/await

    1
    2
    3
    4
    5
    6
    7
    8
    9
    10
    11
    12
    13
    14
    function fn2 () {
    return new Promise((resolve,reject)=> {
    setTimeout(() => {
    console.log('Function 2')
    resolve()
    },500)
    })
    }
    async function asyncFunArr(){
    fn1()
    await fn2()
    fn3()
    }
    asyncFunArr()

webStorm报错Import declarations are not supported by current Javascript version

Posted on 2018-06-23 | In webstorm

贴出报错信息

首先贴出报错信息,在webStorm编辑器上的报错:
Import declarations are not supported by current JavaScript version.

修改webstorm基本配置

在webstorm–>prefrences–>Languages & Frameworks –>JavaScript—>React JSX即可
avatar

Eslint官网

Posted on 2018-06-23 | In 前端

Eslint介绍

插件化的javasceipt代码检测工具
以可扩展/每条规则独立/不内置编码风格为理念编写一个lint工具
通过集成进入,eslint检查代码质量
根据自己的喜好制定一套Eslint配置,然后应用到编写的项目上,所以实现辅助编码规则的执行
eslint可通过npm快速安装
eslint通过Node.js来提供快速运行环境

Getting Started with Eslint

1.Eslint使用Espress进行Javascript解析
2.使用AST进行代码评估模式
3.Eslint是完全插件化的,每一条均为插件,在运行时间内可以增加更多
4.可以自己配置显示错误,waring还是不显示

Configure Eslint

  1. 配置comments
  2. 配置文件: 使用Javascript,JSON或者YAML文件来为一整个文件夹及其子文件夹(并不是home文件夹)指定配置信息。这些可能为.eslintrc.*或者package.json中的eslintConfig,或者在命令行中规定过的
    如果在home文件夹下,Eslint只在无法找到其他配置文件的情况下才会使用
  3. 配置内容
    Environment
    Globals
    Rules
  4. 注意:支持JSX语法和React不同,React应用特定语义到JSX语法,Eslint无法识别
  5. React建议使用eslint-plugin-react
  6. 支持ES6和支持新的ES6 globals不一样

test

Posted on 2018-06-20 | In Hexo教程

nginx反向代理-检查网址无法访问

Posted on 2018-06-20

nginx反向代理-检查网址无法访问

nginx

检查步骤

检查nginx是否正常工作

相关命令

查看nginx配置

解决域名过期导致的网页无法浏览

找到一个新的域名去替换掉过期的域名

如何找到线上环境的域名

在crontab中有个可执行程序用于数据处理,在可执行程序的统计目录下找到其源代码,源代码中有相关域名

更换新的域名

在阿里云中进行域名解析,解析域名到(当前服务器)

重新配置nginx

修改nginx配置文件中对应条目的域名,并且重新启动nginx

crontab域名替换

检查crontab中可执行程序目录下的源码,将域名替换成新的域名,并进行重新编译

after

Posted on 2018-06-20 | In Hexo教程

这是第一个测试博客

这是一个二级标题

这是一个三级标题

Hello World

Posted on 2018-05-17

Welcome to Hexo! This is your very first post. Check documentation for more info. If you get any problems when using Hexo, you can find the answer in troubleshooting or you can ask me on GitHub.

Quick Start

Create a new post

1
$ hexo new "My New Post"

More info: Writing

Run server

1
$ hexo server

More info: Server

Generate static files

1
$ hexo generate

More info: Generating

Deploy to remote sites

1
$ hexo deploy

More info: Deployment

1…89

Root

87 posts
20 categories
23 tags
© 2018 Root
Powered by Hexo
|
Theme — NexT.Mist v5.1.4
本站总访问量 次 | 有人看过我的博客啦